Is Your Infrared Thermometer Accurate? How to Check
Infrared thermometers need regular accuracy/calibration checks, just like any other thermometer. It’s natural for infrared thermometer readings to drift over time, and regular checks will keep your readings accurate.
To learn more about maintaining an accurate infrared thermometer, read our guides for proper use and cleaning/storage.
What is Thermometer Validation?
Validation is the process of checking the accuracy of your thermometer’s readings. If you do a validation test and find your thermometer readings have drifted outside of the model’s specified accuracy, it will need recalibrating.
How Do I Calibrate My Infrared Thermometer?
To calibrate your thermometer, you’ll need to send it to a laboratory. They will adjust the readings and return it to you.
What Equipment Do I Need to Check My Infrared Thermometer’s Accuracy?
There are two things you’ll need to validate your infrared thermometer readings:
- A reference thermometer — A high-accuracy probe thermometer that is used as a comparison point against your infrared device.
- A black body comparator — Absorbs almost all heat and emits a perfectly consistent amount of infrared energy for its temperature, giving infrared thermometers a reliable reference to measure against.

What Temperature Point Can I Validate My Infrared Thermometer At?
The best temperature to perform your accuracy test at is 22 °C room temperature. This is because it is more likely for your comparator to be uniform in temperature, without any frost, steam or moisture which can cause an inaccurate test.
Users often want to validate thermometers closer to the temperature range they use them for. For example, if you’re using your thermometer to measure chilled items, you might want to check the accuracy at 0 °C. This is possible using a properly made ice bath. Read our guide to checking your infrared thermometer using an ice bath to learn how to do it.
To validate your thermometer at a high temperature, you should use a black body calibration machine.
Validating your infrared thermometer at high or low temperatures increases the risk of thermal instability.
What is Thermal Instability?
Thermal instability is when the temperature reading on a thermometer fluctuates and won’t stay steady.
For every 1 °C the environment is above or below 22 °C (ambient temperature), an adjustment factor should be added to your infrared thermometer’s accuracy to allow for the thermal instability.
Typically this is 0.05 °C for RayTemp thermometers. Other infrared thermometers may have a different value.
Here is a table showing the values that need to be considered when using a RayTemp 2 thermometer in cold or hot environments.
*Accuracy and thermal stability for other instruments can vary.

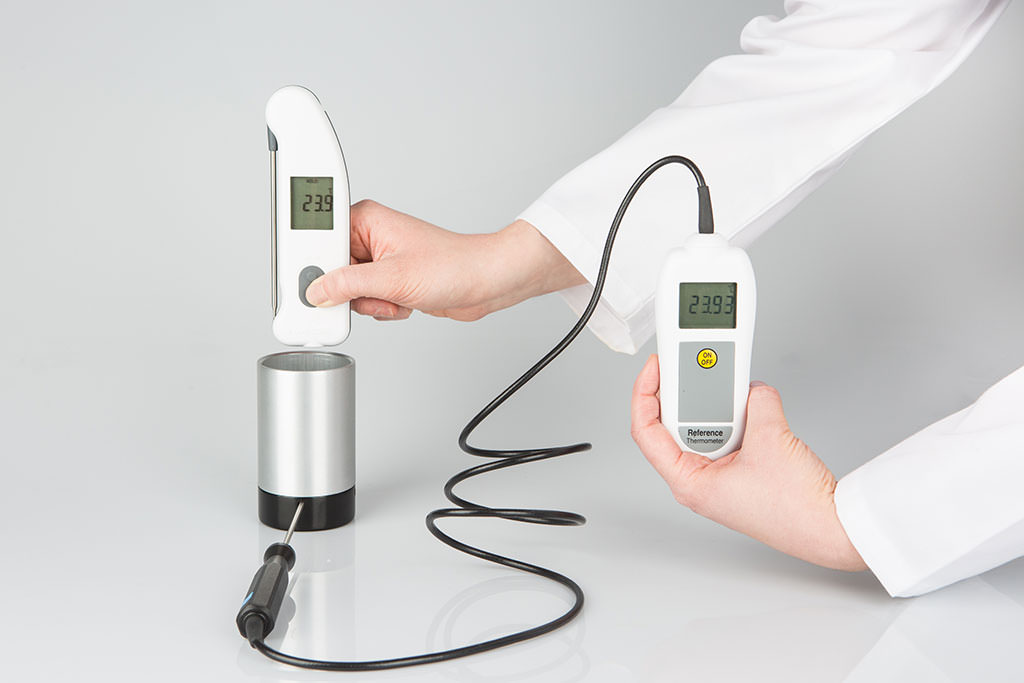
How to Check Your Infrared Thermometer Step-By-Step
Follow the steps below to check your infrared using a comparator cup.
- Ensure the comparator and infrared thermometer are clean and free of any debris or substances that could affect the reading.
- Place the comparator on a flat surface at ambient room temperature.
- Insert the reference thermometer probe into one of the base test holes and allow it to stabilise.
- If the IR device has adjustable emissivity, ensure it is set to 0.95, the correct setting for the matte black surface of the Thermometer Comparator.
- Point the thermometer straight down into the bottom of the comparator and take a measurement. The instrument should read within 1 °C of the reference thermometer at 22 °C ambient room temperature, depending on the accuracy of the thermometer.
Infrared Checks — Dos and Don’ts
- Do:
Calibrate at an ambient temperature of approximately 22 °C if possible. - Be aware of the external factors that influence taking a correct IR reading from the comparator, such as moisture, frost and debris.
- Take the measurements as quickly as possible, to prevent the surface temperature from changing.
Don’t:
- Change the temperature surrounding the comparator before validation or the surface temperature may differ from the internal temperature.
- Position the infrared thermometer too far away, or at an angle, when taking the temperature of the comparator as it may provide an inaccurate reading.
- Forget that the thermometers require time to acclimatise to a different environment.
Learn more about infrared thermometers:
Infrared Thermometers: Accurate Readings & Limitations
Infrared Thermometers: Cleaning & Storing